Open StudSheet

Every stud. Every sheet. Counted.

Type the job. StudSheet draws it, counts every piece with the math shown, and lists the tools and the order of work. For homeowners and pros in the US and Canada.

Open StudSheet
Coming soon on theApp StoreComing soon onGoogle Play

Works in any browser today. No account needed for Sheets.

A 12′ wall framed at 16″ on centerElevation of a 12 foot long, 8 foot tall partition wall: a bottom plate, a top plate and 10 studs, with dimension lines for the 16 inch spacing, the 12 foot length and the 8 foot height, and a tape measure along the floor.16″16″16″16″16″16″16″16″16″12′-0″8′-0″93″ stud163248648096112128
Sheet A-0 · 12′ partition wall, as the wall Sheet counts it
Wall
12′ × 8′partition
On center
16″stud spacing
Studs
10on the layout
Buy
11studs, 2×4 × 8′
Plates
22×4 × 12′
Drywall
74×8 sheets
Sheet A-1 · What a Sheet isEngine output, not a mockup

One page. The whole job.

Answer the few questions that change the answer. You get a Sheet: the drawing, every material counted with the math shown, the tools to own, buy or rent, the order of work, the mistakes that ruin the job, and a stamp that says DIY or pro.

Sheet A-1 · Paint a room

14′ × 12′ room

DIY OK
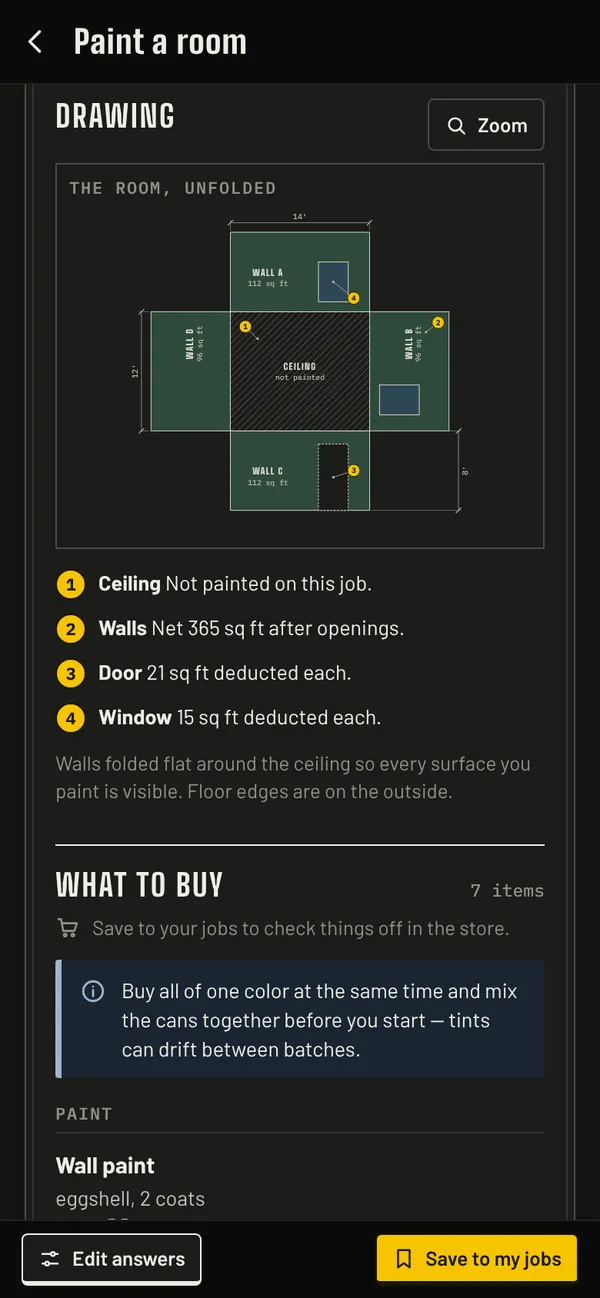
CEILINGnot paintedWALL A112 sq ftWALL C112 sq ftWALL D96 sq ftWALL B96 sq ft14′12′8′1234
The room, unfolded
Paint
2.25gallons, all products
Walls
365sq ft
Coats
2finish

Tools you need

  • 9″ roller frame
  • Extension pole
  • 2½″ angled sash brush
  • 5-gal bucket + roller grid
  • Step ladder (6 ft)
  • Putty knife

14 tools on the Sheet, each marked own, buy or rent

What to buy 7 lines, each with its math
BuyItemHow we got this
2 gallons + 1 quartWall painteggshell, 2 coats365 sq ft of wall (416 minus 1 doors × 21 and 2 windows × 15) × 2 coats ÷ 350 sq ft/gal = 2.09 gal.
1 rollPainter’s tape 1.41″ × 60 yd148 ft to mask (the ceiling line, baseboards and casing) + 10%; 180 ft per roll.
2Canvas drop cloth 9×129×12 canvasWork one wall at a time and leapfrog them.
1 packPlastic sheeting 9×12Cover furniture you can’t move out.
1 tubLightweight spackle8 ozNail holes and dings.
2 coversRoller covers 9″⅜″ nap⅜″ nap for smooth walls — one per product, plus a spare.
1Tray linersfits your trayOne per product.

Sheet S-1 · Deck or balcony

16′ × 12′ deck

DIY OK
FRAMING PLAN2×8 joists at 16″ o.c., beam 2-2×10HOUSESTAIRS16′12′7′SECTIONthrough the beam, not to scale acrossfrost line36″36″3′123456789
Framing plan + section
Deck
192sq ft · 16′ × 12′
Footings
319″ × 36″ deep
Joists
132×8 at 16″ o.c.
Beam
2-2×10³ posts, 7′ apart

Tools you need

  • Tape measure (25 ft)
  • Mason's line + stakes
  • Chalk line
  • 4-ft level
  • Speed square
  • Framing square

29 tools on the Sheet, each marked own, buy or rent

What to buy 22 lines, each with its math
BuyItemHow we got this
17 bagsConcrete mix, 80 lb80 lb bags3 footings: a pad 19″ across × 6″ thick at 36″ deep, then a 12″ pier up to 2″ above the ground = 3.08 cu ft each, +10% = 10.16 cu ft; 80 lb bag ≈ 0.6 cu ft (Quikrete).
3 tubesConcrete form tube12″ × 4′One per pier, cut to 32″ (from the pad to 2″ above the ground).
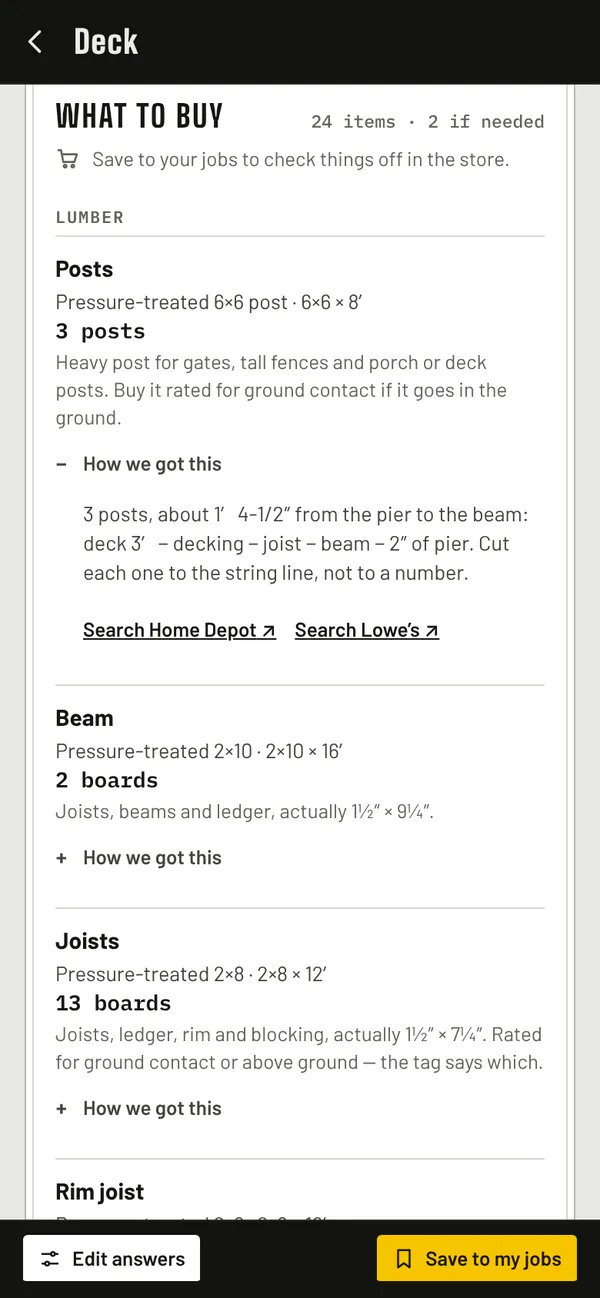
3 postsPressure-treated 6×6 post6×6 × 8′3 posts, about 1′ 4-1/2″ from the pier to the beam: deck 3′ − decking − joist − beam − 2″ of pier. Cut each one to the string line, not to a number.
3 basesPost base or anchor6×6 standoff, galvanizedOne per post: holds it on the pier and off the concrete (IRC R507.4.1).
3 boltsAnchor bolt ⅝″ with nut and washer⅝″, J-bolt or wedge anchorOne per post base, set in the wet concrete (or drilled in later) per the base’s label.
3 capsPost-to-beam connector (post cap)for 6×6 and a 2-ply beamTies the beam to each post (IRC R507.8).
2 boardsPressure-treated 2×102×10 × 16′Beam 2-2×10, 16′ long: 2 plies. Posts 7′ apart, 12″ in from each end; this beam spans up to 7′ 4″ with 10′ 9″ joists (the 12 ft column (IRC Table R507.5(1))).
13 boardsPressure-treated 2×82×8 × 12′13 joists 16″ on center across 16′ (12 spaces + 1), each 11′ 9″ long. 2×8 spans 10′ 9″ with a 12″ overhang (southern pine, 16″ o.c.).
1 boardPressure-treated 2×82×8 × 16′Rim joist across the joist ends, 16′ long, 3 screws into each joist end.
1 boardPressure-treated 2×82×8 × 16′Ledger 16′ long, 2×8: at least 2×8 and as deep as the joists (IRC R507.9.1).
1 boardPressure-treated 2×82×8 × 16′12 blocks of 1′ 2-1/2″ between the joists over the beam: they keep the joists from rolling (DCA 6). Cut 12 × 1′ 2-1/2″ (13 a board) from 16′ boards.
13 hangersJoist hangersfor 2×8, G185 or stainlessOne per joist at the ledger. At least 60% of the joist’s depth; every hole nailed.
13 tiesHurricane ties (joist to beam)galvanizedOne per joist where it crosses the beam (at least 100 lb up and sideways, DCA 6).
4 tiesDeck tension tie, 1,500 lb (for example Simpson DTT2Z)1,500 lb ratedLateral load: two places within 24″ of the deck’s ends (IRC R507.9.2), each a tie on a deck joist and one on a house floor joist inside, joined through the band joist.
2 rodsThreaded rod ½″ × 3 ft with nuts and washersOne per lateral-load connection, through the ledger and band joist.
14 screwsLag screws ½″ with washers (hot-dip galvanized)½″ × 4″ + washerEvery 15″ along 16′ for a 10′ 9″ joist span (IRC Table R507.9.1.3(1)), staggered top and bottom, 2″ from the edges.
2 piecesZ-flashing, 10 ftOver the top of the ledger, 6″ laps, siding lapped over it (IRC R507.2.4).
1 rollSelf-adhered flashing tape, 6″ × 75 ftBehind the ledger and over its top: two strips 16′ long, plus the bolt holes.
≈364 (4 boxes of 100)Connector fastenershanger nails or connector screwsAbout 10 per hanger and tie and 12 per post base and cap — the size on each connector’s label, not deck screws.
≈183 (2 boxes of 100)Coated deck screws3″ coated3 per joist end into the rim, 2 per block end, and the beam’s plies in two rows every 16″ (10d nails work too).
28 boards5/4×6 treated deck board5/4×6 × 16′26 rows of 5-1/2″ boards with 1/8″ gaps across 12′ = 26 boards, +5% for culls and miscuts.
≈676 screws (7 boxes of 100)Coated deck screws2½″ coated2 per board at every joist (DCA 6): ≈338 crossings.

Sheet M-1 · Railings and guards

12′ glass railing

PRO STEP
GLASS BETWEEN POSTSbalcony edge, from outside · 3 of 3 openings↓ 10′ down to the ground36″4′ on center1″1234
Elevation
Guard
36″code: 36″
Posts
44′ on center
Glass
3panels · 28 sq ft · 204 lb
Length
12′of railing

Tools you need

  • Tape measure (25 ft)
  • Carpenter's pencil
  • 4-ft level
  • Cordless drill/driver
  • Impact driver
  • Socket and ratchet set

14 tools on the Sheet, each marked own, buy or rent

What to buy 6 lines, each with its math
BuyItemHow we got this
4 postsGlass railing post (drilled for clamps)for a 36″ guard, side mount2 ends, 2 between, no more than 5′ apart.
3 panels, 44″ wide × 30-1/2″ tallLaminated tempered glass panels, made to order9/16″ laminatedOne panel per opening: 46″ between posts less 1″ at each post; from 2″ above the floor to 2″ under the top rail. 28 sq ft, about 204 lb in all (68 lb a panel). Measure the real openings before you order.
12 clampsGlass clamps (stainless, with gaskets)for 9/16″ glassTwo on each side of every panel.
1 lengthMetal top rail with post bracketsflat × 20′12′ of top rail on the posts.
2 boardsPressure-treated 2×102×10 × 8′ (or your joists’ size)Two blocks between the joists at each post, fastened with structural screws, so the rim can’t roll (IRC R507.10.1).
16 lags⅜″ structural lag screws (galvanized or stainless)⅜″ × 4″4 per post base into blocking.

Numbers from StudSheet’s own engine for these answers, generated when this page was built. Open a Sheet to change the answers.

Drawing
Plan, elevation or section, with dimensions and numbered keys
Materials
Every piece, with the math, grouped by store aisle
Tools
What you need, what’s nice to have, what to rent
Steps
In the order of work, with dry and cure times
Stamp
DIY OK, PRO STEP or PRO JOB
Sheet A-2 · Trades22 Sheets / 14 trades

22 Sheets. 14 trades.

From a bedroom repaint to a panel upgrade. Homeowners get the DIY Sheets and an honest page on what’s involved in licensed work. Pros get pro Sheets with quantities, costs, permits and inspections, and estimate templates for every trade.

Sheet index

  1. 01Build an interior wallCarpentry & framingDIY OK
  2. 02Build a garden or retaining wallConcrete & masonryDIY OK
  3. 03Build deck or porch stairsDecks, fences & railingsDIY OK
  4. 04Paint a roomPaintingDIY OK
  5. 05Carpet a roomFlooring & tileDIY OK
  6. 06Install vinyl plank flooringFlooring & tileDIY OK
  7. 07Tile a floorFlooring & tileDIY OK
  8. 08Finish a basementGeneral contractingPRO STEP
  9. 09Hang and finish drywallDrywallDIY OK
  10. 10Addition shellGeneral contracting · pro SheetPRO STEP
  11. 11Hardwood and laminate floorsFlooring & tileDIY OK
  12. 12Paint the outside of a housePaintingPRO STEP
  13. 13Deck or balconyDecks, fences & railingsDIY OK
  14. 14Railings and guardsDecks, fences & railingsDIY OK
  15. 15FenceDecks, fences & railingsDIY OK
  16. 16Concrete slab or footingsConcrete & masonryPRO STEP
  17. 17Shingle roofRoofing & sidingPRO STEP
  18. 18Circuits and wiring runsElectrical · pro SheetPRO JOB
  19. 19Panel or service upgradeElectrical · pro SheetPRO JOB
  20. 20Plumbing rough-inPlumbing · pro SheetPRO JOB
  21. 21Water heater replacementPlumbing · pro SheetPRO JOB
  22. 22Heating and cooling sizingHVAC · pro SheetPRO JOB
DIY OK
You can do this.
PRO STEP
DIY, with a pro for one step.
PRO JOB
Hire it out. Homeowners get what’s involved and quotes; pros get the full Sheet.

Trades with templates

  • General contracting
  • Carpentry & framing
  • Drywall
  • Painting
  • Flooring & tile
  • Decks, fences & railings
  • Concrete & masonry
  • Roofing & siding
  • Windows & doors
  • Metal & glass
  • Electrical
  • Plumbing
  • HVAC
  • Commercial

No step-by-step wiring or gas instructions, and no invented structural sizing: beams, headers and cantilevers are the engineer’s call.

Sheet A-3 · For prosPro tools: free at launch

Run the job from the same page.

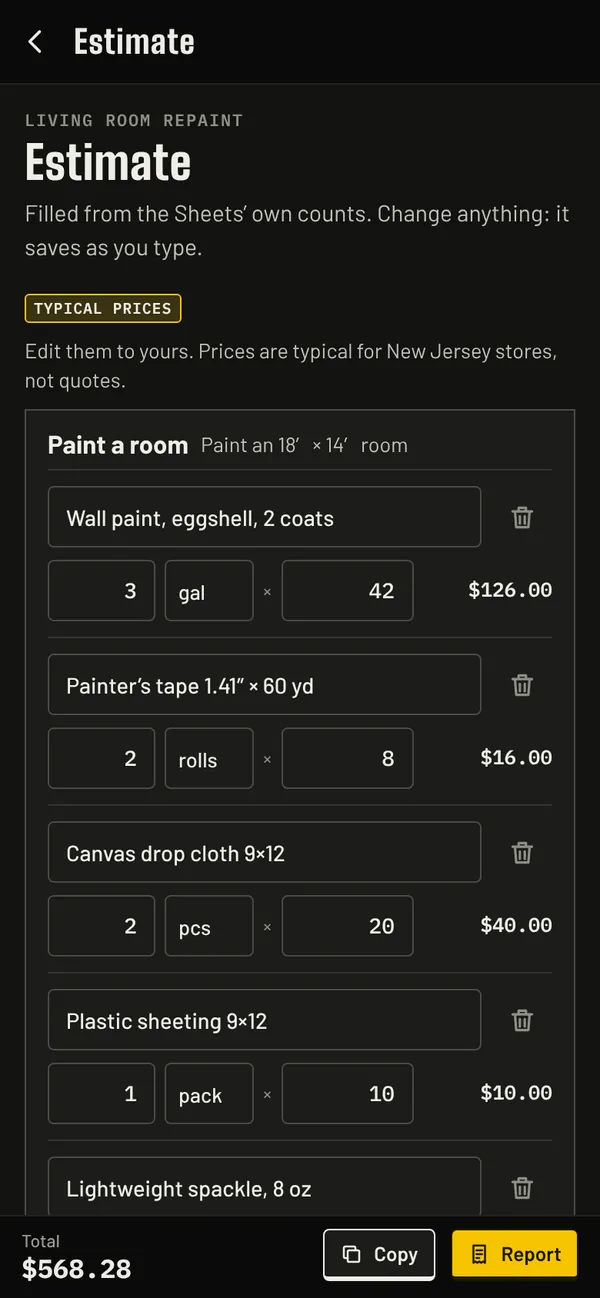
Switch to Pro and the Sheet becomes the start of the paperwork: its counts fill the estimate, the estimate becomes the invoices, and the job goes on the crew’s schedule.

  • Estimates

    Filled from the Sheet’s own counts, your price book and templates for your trade.

  • Invoices and e-signatures

    Clients approve estimates and change orders on a link, with their signature. Deposit, progress and final invoices.

  • Crew logins

    Your crew gets their own sign-in: their jobs, clock in and out, photos back to you to approve. Never your prices.

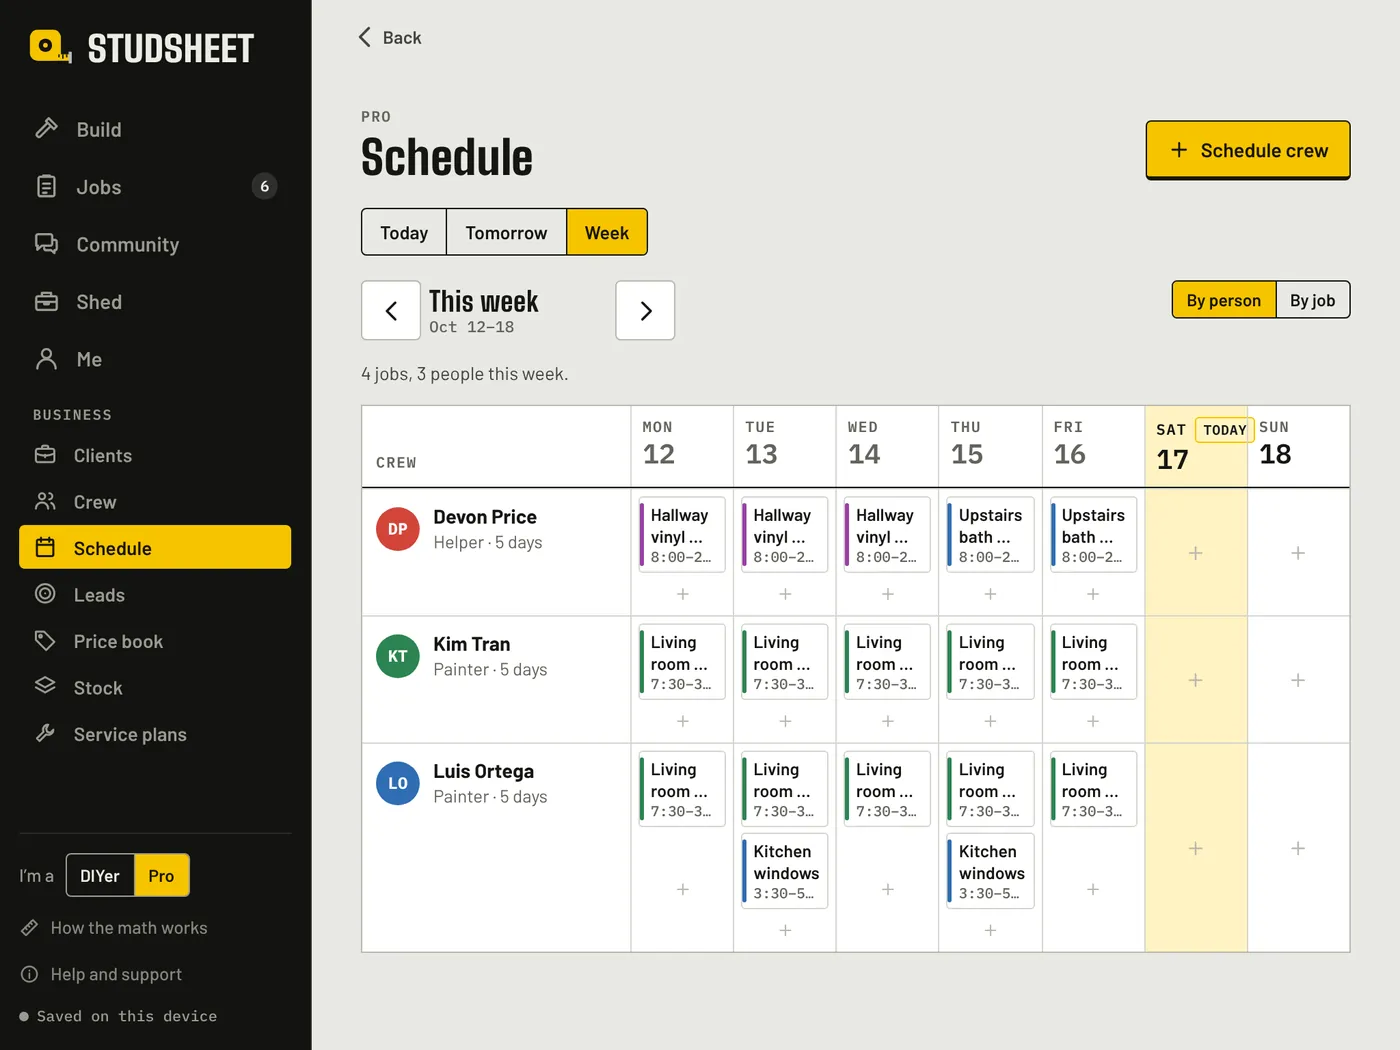
  • Schedule

    Who’s where, by day or week, by person or by job. Double bookings are flagged.

  • Service plans

    Recurring visits, checklists filled on the phone, QR labels on the equipment.

  • Stock

    What’s in the van and the shop, every move in and out, and a reorder list.

  • Lead board

    Quote requests from homeowners near you, each sent to up to 3 verified local pros. Their contact unlocks when you respond.

StudSheet on a tablet: the crew schedule for a week, three people across four jobs.
Schedule, by person
StudSheet on a phone in the dark theme: an estimate filled from the paint Sheet’s counts, total $568.28.
Estimate from the Sheet
Pro account
Free at launch
Getting paid
Your payment link, Zelle, Interac e-Transfer or check; cards straight to your own Stripe account, no StudSheet fee
Lead board
Free at launch, for pros registered in the app
Your data
Jobs and clients stay on your device unless you turn on sync
Sheet A-4 · Phone, tablet, web390 / 1024 / any browser

In the truck. At the table. At the desk.

The same app on iPhone, Android and the web, in light or dark. The math runs on your device: no waiting on a server, and in the phone apps, no signal needed.

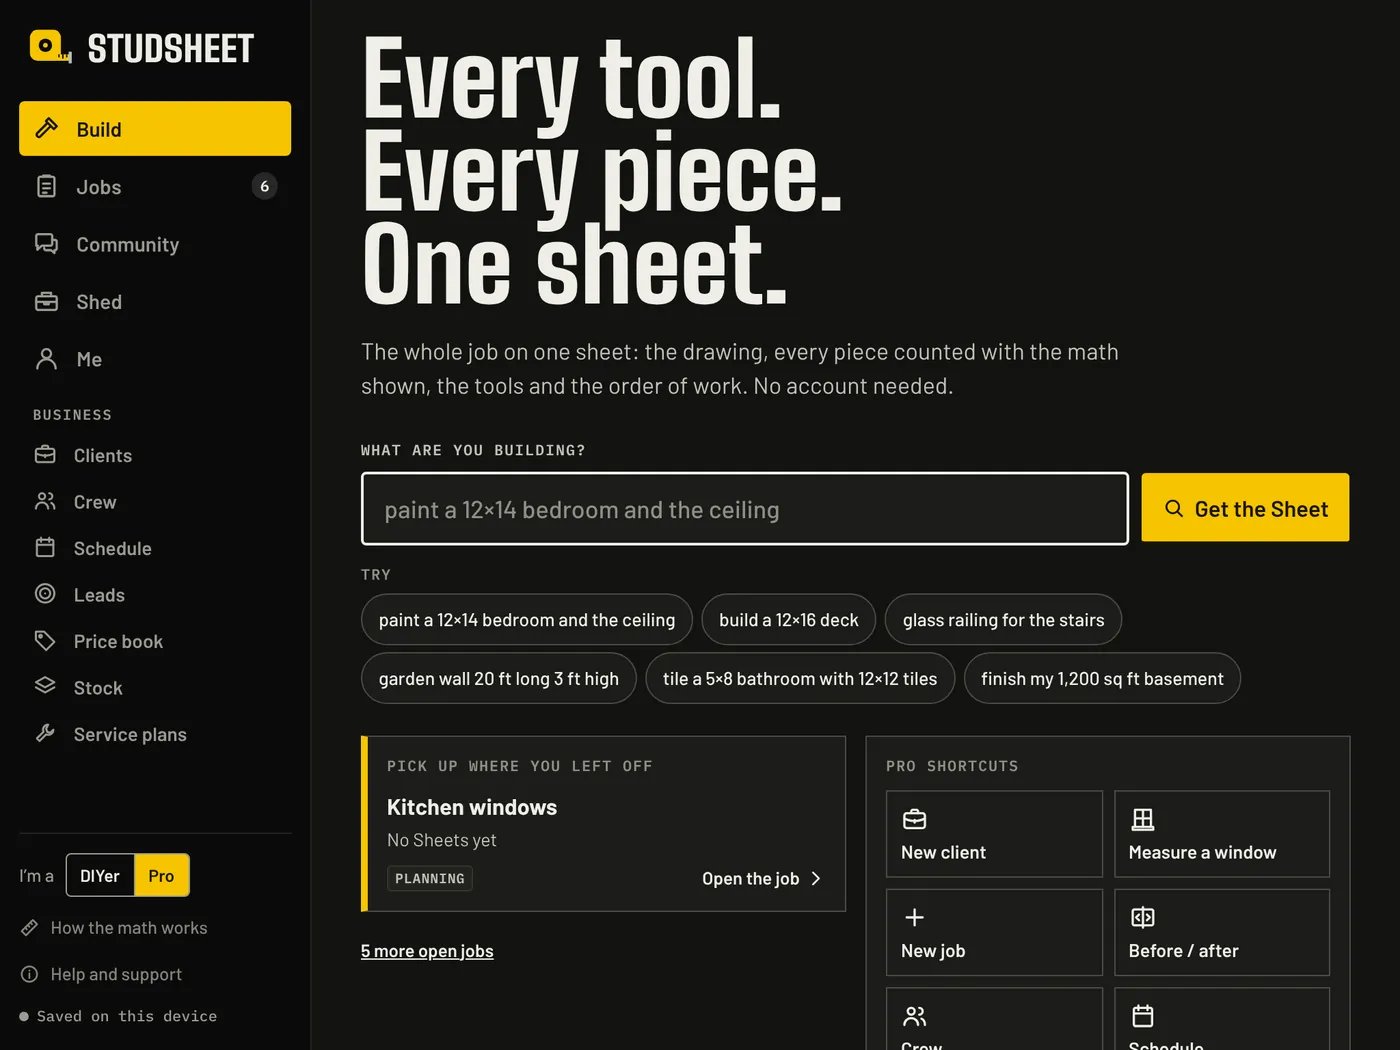
StudSheet in a browser, dark theme: the Build screen with a search box that reads 'paint a 12×14 bedroom and the ceiling' and pro shortcuts.
Build: type the job in plain words
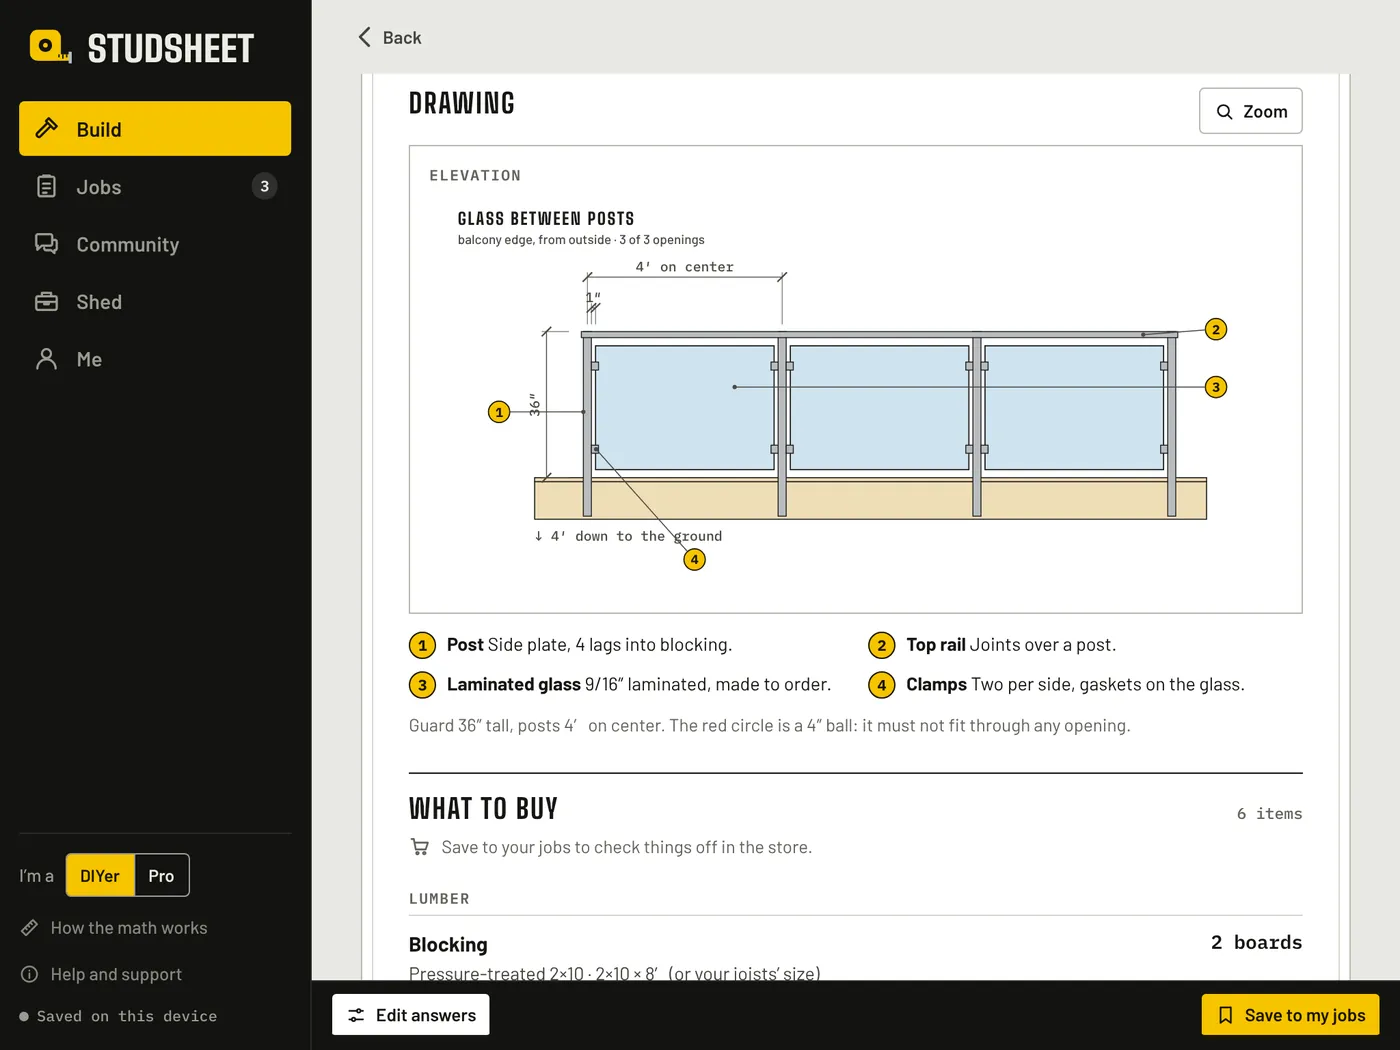
StudSheet on a tablet: the railing Sheet’s elevation of a glass balcony railing with numbered keys.
Railing Sheet: the elevation, keyed
StudSheet on a phone, dark theme: the paint Sheet’s drawing of the room unfolded, with keys for the ceiling, walls, door and windows.
Paint Sheet: the room, unfolded
StudSheet on a phone, light theme: the deck Sheet’s What to buy list, with How we got this open on the posts.
Deck Sheet: how we got 3 posts
iPhone and Android
Waiting for App Store and Google Play approval
Web
app.studsheet.com, in any modern browser
Light or dark
Follows your device, or pick one in Settings
On the device
Jobs, clients and lists are saved on your phone or computer; sync is optional
Sheet A-5 · CommunityReal people only

Ask people who’ve done it.

Post a question with your Sheet attached. Answers come from homeowners who’ve done the job and pros who do it for a living.

  • Verified pro

    Pros checked by the StudSheet team carry the badge, so you know who does this for a living.

  • StudSheet team

    Starter answers come from the team’s own labeled account, never from made-up users.

  • Founding member

    Early members get the badge and invite links for people they know.

No invented users, reviews, posts or activity. Anything written by AI is labeled as AI.

Sheet A-6 · US + Canadaft-in / metric

Feet and inches, or metric.

Set your state or province and the Sheets follow its rules: the IRC and NEC in the US, the National Building Code and the CEC in Canada, with notes where your area differs. Metric when you pick it, and no US prices in Canada.

The same answers, two places
LineNew Jersey feet and inchesOntario metric
Wall paint14′ × 12′ room2 gallons + 1 quart365 sq ft of wall (416 minus 1 doors × 21 and 2 windows × 15) × 2 coats ÷ 350 sq ft/gal = 2.09 gal.2 × 3.78 L + 1 × 946 mL33.9 m² of wall (38.6 minus 1 doors × 2.0 and 2 windows × 1.4) × 2 coats ÷ 32.5 m² per 3.78 L = 7.9 L. Cans are counted at 3.78 L — read the litres on the can (Canadian “gallon” cans hold 3.6–3.79 L).
Guard heightGlass balcony railing36″code: 36″1.07 mcode: 1070 mm
Deck footings16′ × 12′ deck319″ × 36″ deep2483 mm × 1.20 m deep
Deck beamIRC span table vs. the Canadian deck guide2-2×10³ posts, 7′ apart3-2×122 posts, 4.27 m apart
Units
Feet and inches, or metric, per device
Codes
Cited on the line that uses them
Prices
Typical US store prices; none shown in Canada
Always
Confirm with your building department
Sheet A-8 · QuestionsStraight answers

Questions.

Is StudSheet free?

Yes. Sheets, jobs, the shopping list and build mode are free for homeowners, always. Pro tools are free at launch. There are no in-app purchases.

Do I need an account?

Not for Sheets, jobs, lists, the Tool Shed or the pro notebook: they’re saved on your device. An account is only for the community, sync between devices, the lead board, client links and card payments.

When is it on iPhone and Android?

The apps are waiting for App Store and Google Play approval. Until then StudSheet runs in any browser at app.studsheet.com, and you can add it to your home screen.

Does it work in Canada?

Yes. Set your province for the National Building Code, the CEC and provincial notes, and pick metric if you like. US prices aren’t shown in Canada.

Where do the numbers come from?

Each Sheet’s math runs on your device and shows its work under “How we got this”, with the code section or manufacturer guide it relies on. Anything that isn’t a published rule is marked typical. Code notes are a starting point: confirm with your building department.

Will it tell me how to wire a panel?

No. For homeowners, electrical, gas, plumbing and HVAC systems, additions and load-bearing walls go to a page on what’s involved and how to get quotes. Pros get quantities, costs, permits and inspection checklists, never step-by-step wiring or gas instructions.

Where do quote requests go?

Only to pros registered and verified in the app, up to 3 local pros per request. Pros see the job and the area; your contact goes only to a pro who responds. If no pros cover your area yet, the app says so and keeps your request open for 30 days.

Who makes StudSheet?

StudSheet is built by IONIAN Digital. Questions: support@studsheet.com.

Get the Sheet.

Open StudSheet
Coming soon on theApp StoreComing soon onGoogle Play